Table of Contents
Starting a dropshipping business is exciting. You’ve picked your niche, sourced products, and you’re ready to build your online store. But then you hit a crucial question: Where will your website live? And how will you manage its hosting without a degree in server administration?
Many dropshippers turn to shared hosting initially, but quickly encounter limitations – slow loading times, unpredictable performance, and lack of control. Dedicated hosting or complex cloud setups can be expensive and overwhelming. This is where a powerful, user-friendly server control panel becomes invaluable.
Enter CloudPanel.
CloudPanel is a free, modern server control panel designed specifically for PHP-based applications like WordPress, WooCommerce, Magento, and PrestaShop – the backbone of most dropshipping stores. It simplifies server management, offering robust features without the complexity or cost of traditional panels like cPanel or Plesk.
In this in-depth guide, we’ll walk you through everything you need to know to install and configure CloudPanel for your dropshipping website, from initial prerequisites to advanced security and scaling tips. By the end, you’ll understand why CloudPanel is an ideal choice for dropshippers looking for performance, security, and ease of use.
Introduction to CloudPanel for Dropshipping
Launching a successful dropshipping store requires more than just great products; it demands a reliable, fast, and secure online presence. Your website is your storefront, and any downtime or sluggishness directly impacts sales and customer trust.
Why CloudPanel is Ideal for Dropshipping:
- Cost-Effectiveness: CloudPanel itself is free to use, requiring only the cost of your underlying server (VPS or cloud instance). This significantly reduces operational costs compared to panels with recurring licenses. For a business model focused on maximizing margins like dropshipping, this is a major advantage.
- Simplicity: Despite its power, CloudPanel boasts an intuitive web interface. Managing websites, databases, users, and security features is straightforward, even for those new to server administration. This allows you to focus on growing your business, not wrestling with server configurations.
- Scalability: CloudPanel runs on a VPS or cloud server, giving you the flexibility to easily upgrade your server resources (CPU, RAM, storage) as your dropshipping store grows and traffic increases. You’re not locked into restrictive shared hosting plans.
- Performance: CloudPanel is built for speed. It supports optimized server stacks (like Nginx) and makes it easy to integrate caching solutions, ensuring your e-commerce site loads quickly, which is crucial for reducing bounce rates and improving search engine rankings.
Key Features that Benefit Dropshippers:
- One-Click CMS Installs: Easily deploy WordPress (with WooCommerce), Magento, or PrestaShop in just a few clicks, saving significant time on manual installation.
- Security Tools: Built-in features like free Let’s Encrypt SSL certificates, firewalls, and two-factor authentication help protect your store and customer data.
- Free Licensing: No recurring fees for the control panel software itself.
- Resource Management: Monitor server resources directly from the dashboard to ensure your site is performing optimally.
- Backup Management: Schedule and manage website backups to protect your valuable data.
Choosing CloudPanel provides a solid foundation for your dropshipping website, offering the performance and reliability needed for a successful online business without breaking the bank or requiring deep technical expertise.
Prerequisites for Installation
Before you can install CloudPanel, you need a few things in place. Getting these prerequisites sorted beforehand will ensure a smooth installation process.
Server Requirements (VPS/Cloud Hosting Options):
CloudPanel cannot be installed on standard shared hosting. It requires a dedicated server environment, typically a Virtual Private Server (VPS) or a cloud computing instance. This gives you root access and dedicated resources.
CloudPanel officially supports installation on:
- Debian 10 or 11: This is the recommended operating system.
- Ubuntu 20.04 LTS: Another popular and supported choice.
You’ll need a server with the following minimum specifications:
- CPU: 1 core
- RAM: 2 GB (4 GB or more is highly recommended for e-commerce, especially with WooCommerce or Magento)
- Disk Space: 15 GB (SSD recommended for performance; 30 GB or more is practical for storing website files, databases, and backups)
Popular Cloud/VPS Providers:
You can get a suitable VPS from many providers. Some popular choices that work well with CloudPanel include:
- DigitalOcean: Known for its developer-friendly interface and reasonable pricing.
- AWS (Amazon Web Services): Offers EC2 instances, providing a wide range of options and scalability, though potentially more complex for beginners.
- Google Cloud Platform (GCP): Offers Compute Engine instances, similar to AWS.
- Vultr: Another provider known for performance and competitive pricing.
- Linode: A long-standing and reliable VPS provider.
- Contabo: is a hosting provider known for offering generous server resources (CPU, RAM, Storage) at very competitive and affordable prices, making them a popular choice for users seeking high value for money
Choose a provider and spin up a new server instance with a fresh installation of Debian 10/11 or Ubuntu 20.04 LTS. Make sure you have the server’s IP address and root login credentials (or a user with sudo privileges and an SSH key).
Domain Setup and SSL Considerations for E-commerce:
Your dropshipping store needs a domain name (e.g., yourdropshippingstore.com). Before installing CloudPanel and your e-commerce platform, your domain’s DNS (Domain Name System) records need to point to your new server’s IP address.
Specifically, you’ll need to create or update the following DNS records with your domain registrar or DNS provider:
- An A record pointing your domain name (e.g.,
yourdropshippingstore.com) to your server’s IP address. - An A record pointing the
wwwsubdomain (e.g.,www.yourdropshippingstore.com) to your server’s IP address.
DNS changes can take some time to propagate across the internet (usually a few minutes, but occasionally up to 24 hours). It’s best to do this before you plan to install CloudPanel or add your site.
SSL Certificate: For any e-commerce site handling sensitive customer information and payments, an SSL certificate is non-negotiable. It encrypts data transmitted between the user’s browser and your server, ensuring security and trust. CloudPanel makes obtaining and installing free Let’s Encrypt SSL certificates very easy, which we’ll cover later. Having your domain pointed to the server is a prerequisite for obtaining the SSL certificate.
Ensure you have access to your server via SSH (Secure Shell). You’ll need an SSH client like OpenSSH (built into Linux/macOS) or PuTTY/Termius (for Windows).
Step-by-Step CloudPanel Installation Guide
Once your server is ready and your domain is pointing to its IP address, you can proceed with installing CloudPanel. This process is done via the server’s command line using SSH.
Accessing Your Server via SSH:
Open your terminal or SSH client and connect to your server using the root user or a user with sudo privileges.
Bash
ssh root@your_server_ip_address
Replace your_server_ip_address with the actual IP address of your VPS. If you’re not using the root user, replace root with your username. You might be prompted to accept the server’s fingerprint the first time you connect. You will then be asked for your password.
Running the Installation Script:
CloudPanel provides a simple script to automate the installation process. This script handles installing all necessary software (Nginx, PHP, MySQL, etc.) and configuring CloudPanel itself.
First, it’s a good practice to update your server’s package list and upgrade existing software:
Bash
sudo apt update && sudo apt upgrade -y
This ensures you have the latest security patches and software versions before installing CloudPanel.
Now, download and run the CloudPanel installation script. The script is typically run with curl and piped directly to bash. Always refer to the official CloudPanel documentation for the absolute latest installation command, as it can sometimes change. However, the command usually looks something like this:
Bash
curl -sS https://installer.cloudpanel.io/ce/v2/install.sh | sudo bash
Let’s break down this command:
curl -sS: Downloads the script quietly (-s) and shows errors if they occur (-S).https://installer.cloudpanel.io/ce/v2/install.sh: The URL of the official CloudPanel installation script for the Community Edition (CE).|: This is a pipe. It takes the output of thecurlcommand (the script itself) and passes it as input to the next command.sudo bash: Executes the downloaded script withbashandsudoprivileges, which are necessary to install system-level software.
Okay, installing CloudPanel via PuTTY means you’ll be using the PuTTY SSH client on your Windows computer to connect to your server and run the CloudPanel installation commands. PuTTY is simply the tool you use to access the server’s command line remotely.
Here’s how to do it step-by-step:
Prerequisites:
- A Server: A VPS or Cloud Server with a supported operating system (Debian 10, Debian 11, or Ubuntu 20.04 LTS). Make sure it meets the minimum requirements (1 CPU core, 2GB RAM, 15GB Disk – though more is recommended).
- Server IP Address and Root Credentials: You need the IP address of your server and the password for the
rootuser (or a standard user withsudoprivileges). - PuTTY: Download and install PuTTY on your Windows machine from the official PuTTY website.
Steps to Install CloudPanel Using PuTTY:
Step 1: Connect to Your Server via PuTTY
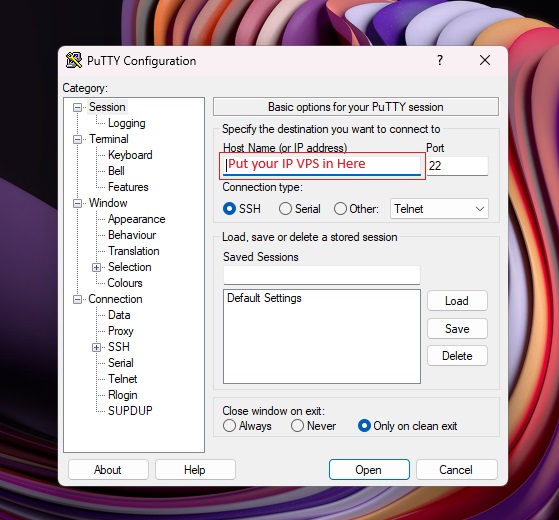
- Open the PuTTY application on your Windows computer.
- In the “Session” category, find the “Host Name (or IP address)” field. Enter your server’s IP address here.
- The “Port” should remain
22(the standard SSH port) unless your server provider has specified a different one. - Ensure “Connection type” is set to
SSH. - (Optional but Recommended) You can save your session settings by entering a name under “Saved Sessions” and clicking “Save”. This allows you to quickly connect next time.
- Click the “Open” button.
- Security Alert (First Connection Only): The first time you connect to a server, PuTTY will show a security alert asking if you trust the host. This is normal. It’s showing you the server’s unique security key fingerprint. Click “Accept” to continue and store the key. You won’t see this warning again for this server unless the key changes (which could indicate a security issue or server reconfiguration).
- Login: A terminal window will open.
- The prompt will ask for
login as:. Typeroot(or your username if you’re not using root) and press Enter. - Next, it will ask for the password. Type your server’s root password (or your user’s password) and press Enter. Note that PuTTY does not show asterisks or any characters as you type the password – this is a security feature. Just type it carefully and press Enter.
- The prompt will ask for
- If the credentials are correct, you will be logged into your server’s command line. You should see a command prompt, typically ending with
#(for root) or$(for a standard user).
Step 2: Run the CloudPanel Installation Commands
Now that you are connected to your server via PuTTY, you will execute the standard CloudPanel installation commands.
- Update Server Packages (Recommended First Step):Type the following command into the PuTTY window and press Enter: Bash
sudo apt update && sudo apt upgrade -yThis command updates the list of available packages and upgrades the existing software on your server. It might take a few minutes. - Download and Run the CloudPanel Installation Script:Type the following command into the PuTTY window and press Enter: Bash
curl -sS https://installer.cloudpanel.io/ce/v2/install.sh | sudo bashImportant: Always verify the latest installation command on the official CloudPanel documentation before running it, as the URL or command might change. - Follow the On-Screen Prompts:The script will download and install CloudPanel and its dependencies (Nginx, PHP, MySQL/MariaDB, etc.). During the process, it will pause and ask you to configure the initial administrator user for CloudPanel.
- You will be prompted to enter your Email Address and a Password for the CloudPanel admin user. Choose a strong, secure password.
- Enter the information when prompted and press Enter after each entry.
- Wait for Installation to Complete:The script will continue running, installing and configuring the necessary software. This process can take 10-30 minutes or longer depending on your server’s speed and internet connection. The PuTTY window will show the progress.
- Note the Access URL:Once the script finishes successfully, it will display a message indicating completion and provide you with the URL to access your CloudPanel web interface. This URL will be in the format:https://your_server_ip_address:8443
Step 3: Access CloudPanel in Your Web Browser
- Open a web browser on your computer.
- Go to the URL provided at the end of the installation script (e.g.,
https://your_server_ip_address:8443). - Your browser will likely show a security warning because CloudPanel uses a self-signed SSL certificate initially. Accept the risk and proceed to the site.
- You will see the CloudPanel login screen. Log in using the email address and password you created during the installation script prompts.
You have now successfully installed CloudPanel on your server using PuTTY! You can close the PuTTY window (typing exit and pressing Enter in the terminal is good practice before closing).
From here, you can start adding your dropshipping sites as outlined in the previous steps (adding domains, installing CMS, configuring settings, etc.).
What Happens During Installation:
The script will perform several actions:
- Checks System Compatibility: It verifies that your operating system version is supported.
- Installs Dependencies: It installs necessary packages like Nginx, PHP, MySQL/MariaDB, Postfix, Varnish, Redis, and other tools.
- Configures Services: It sets up and configures these services to work together.
- Installs CloudPanel: It downloads and installs the CloudPanel web interface software.
- Sets up Initial User: It will prompt you to set up the initial administrator user for CloudPanel, including your email address and password. Remember these credentials!
- Firewall Configuration: It typically configures the server’s firewall (UFW or nftables) to allow necessary ports (like 80 for HTTP, 443 for HTTPS, 22 for SSH, and the CloudPanel port, usually 8443).
The installation process can take anywhere from 10 to 30 minutes depending on your server’s speed and internet connection. The script will output its progress to the terminal.
Accessing the CloudPanel Interface:
Once the script completes successfully, it will provide you with a URL to access the CloudPanel web interface. This URL will usually be in the format:
Open your web browser and navigate to this address.
Initial Login:
- Your browser might show a security warning because CloudPanel uses a self-signed SSL certificate by default. You can safely proceed past this warning for the initial login.
- You will be presented with the CloudPanel login screen. Enter the email address and password you set up during the installation script execution.
Congratulations! You have successfully installed CloudPanel on your server. The next steps involve configuring it for your specific dropshipping site needs.
Troubleshooting Installation Issues:
If the installation fails, the script will usually provide an error message. Common issues include:
- Unsupported OS: Ensure you are using a supported Debian or Ubuntu version.
- Insufficient Resources: Check if your server meets the minimum RAM and disk space requirements.
- Network Issues: Ensure your server can access the internet to download packages.
- Firewall on your local machine: Make sure your local network firewall isn’t blocking the port (8443) needed to access the CloudPanel interface.
Review the output of the installation script carefully. If needed, you might need to start with a fresh server instance and try again. The official CloudPanel documentation is the best resource for specific troubleshooting steps.
Configuring CloudPanel for E-Commerce
With CloudPanel installed, the next crucial phase is configuring it to provide the best performance for your e-commerce website, especially if you’re using platforms like WooCommerce (on WordPress) or Magento.
Optimizing PHP and MySQL Settings:
E-commerce websites, particularly those with many products, plugins, and transactions, can be resource-intensive. Optimizing PHP and MySQL settings ensures they can handle the load efficiently. CloudPanel provides easy access to these settings.
- PHP Settings:
- Navigate to the “Server” section in CloudPanel and find the PHP configuration.
- Key settings to consider adjusting (access these cautiously and based on your site’s needs and server resources):
memory_limit: The maximum amount of memory a script can consume. E-commerce sites often need more than the default (e.g., 256M or 512M).max_execution_time: The maximum time a script is allowed to run. Important for long processes like importing products or running updates. (e.g., 120 or 300 seconds).upload_max_filesizeandpost_max_size: Maximum size for file uploads (e.g., product images).
- You can often edit the
php.inifile directly via CloudPanel’s file manager or SSH, or CloudPanel might offer common settings in the UI.
- MySQL/MariaDB Settings:
- MySQL (or MariaDB, often used interchangeably) is your database server, storing all product information, customer data, orders, etc.
- Access MySQL configuration (often via
/etc/mysql/or/etc/mysql/mariadb.conf.d/via SSH, or CloudPanel might provide database-specific settings). - Key settings (adjusting these requires understanding database performance):
innodb_buffer_pool_size: A critical setting that determines how much data the database keeps in memory. A larger value often improves performance, but shouldn’t exceed available RAM. This is often the most impactful setting.max_connections: The maximum number of simultaneous connections allowed to the database. E-commerce sites with many concurrent users might need to increase this.
- CloudPanel’s interface might offer some database management tools, but deeper optimization often involves editing configuration files via SSH.
Setting Up Caching (Redis/Varnish) for Faster Load Times:
Caching is paramount for e-commerce speed. It stores frequently requested data (like rendered web pages or database query results) in memory or temporary files so the server doesn’t have to regenerate them for every visitor. CloudPanel supports integrating powerful caching mechanisms.
- Varnish Cache: A reverse proxy HTTP accelerator. It sits in front of your web server (Nginx) and caches full web pages. This dramatically speeds up delivery of static or semi-static content. CloudPanel has built-in support for Varnish, making it relatively easy to enable and configure for your site. It’s excellent for anonymous users Browse product pages.
- Redis: An in-memory data structure store, used as a database, cache, and message broker. For e-commerce, Redis is often used for object caching (caching results of database queries) or session storage. WordPress plugins (like Redis Object Cache) can integrate with a Redis instance managed by CloudPanel. This helps speed up dynamic parts of your site and logged-in user experiences.
CloudPanel’s website settings for each site you add will typically have options to enable and configure Varnish and/or Redis. Enabling these, combined with a good e-commerce platform caching plugin (like WP Super Cache, W3 Total Cache, or LiteSpeed Cache if using LiteSpeed, or specific plugins for Magento/PrestaShop), will significantly boost your site’s performance and user experience.
Important Note: After changing PHP or MySQL settings, you usually need to restart the respective services for the changes to take effect. CloudPanel often provides buttons in the UI to restart services, or you can use SSH:
Bash
sudo systemctl restart phpX.Y-fpm  # Replace X.Y with your PHP version (e.g., php8.1-fpm)
sudo systemctl restart mysql       # Or mariadb
sudo systemctl restart nginx
By optimizing these settings and implementing caching, you ensure your dropshipping store can handle traffic, process transactions quickly, and provide a smooth experience for your customers.
Integrating Dropshipping Platforms
One of CloudPanel’s key strengths for dropshipping is how easily it allows you to install and manage popular e-commerce platforms.
Installing WordPress/WooCommerce or PrestaShop via CloudPanel:
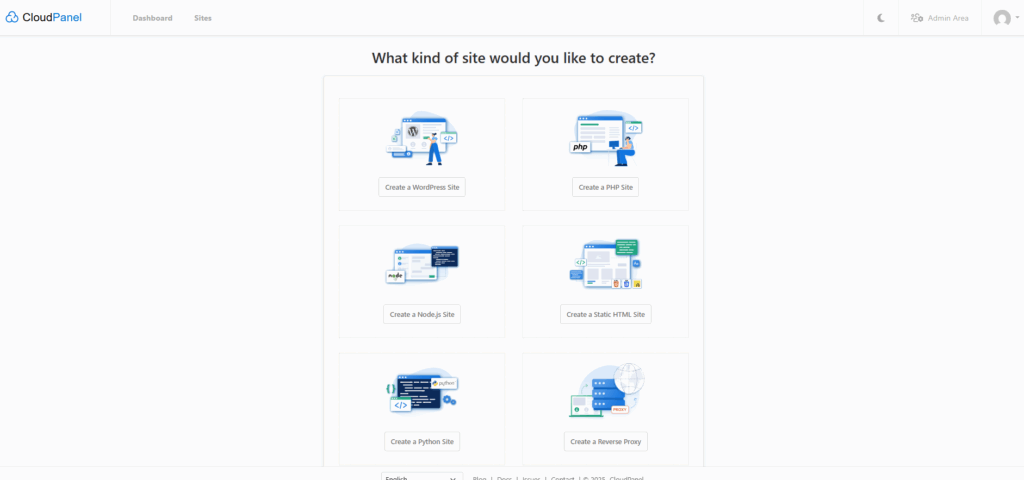
CloudPanel features “One-Click” installers for several popular CMS and e-commerce platforms. This automates the process of creating a database, downloading the platform files, and running the initial setup.
- Add a New Site: In the CloudPanel interface, find the option to “Add Site” or “Create Site.”
- Choose Application: Select the application you want to install. You’ll typically see options for WordPress, WooCommerce (which is a plugin for WordPress), Magento, PrestaShop, and others. Choose WordPress if you plan to use WooCommerce, or select PrestaShop if that’s your platform of choice.
- Enter Domain Details: Enter your domain name (e.g.,
yourdropshippingstore.com). - Set up Database and User: CloudPanel will automatically create a new database and database user for this site. You’ll be shown the credentials – save these securely, as some plugins might require them later.
- Complete Installation: CloudPanel downloads the necessary files and sets up the basic installation. For CMS like WordPress, it might redirect you to the standard setup wizard to create the admin user.
This process is significantly faster and less prone to errors than manually downloading files, creating databases via the command line, and configuring web servers.
Connecting to AliExpress/Oberlo with Plugins:
Once your e-commerce platform (like WordPress with WooCommerce) is installed, you’ll integrate it with dropshipping suppliers. This is typically done via plugins or extensions specific to your platform.
- WooCommerce: Plugins like AliDropship (paid), Dsers (official AliExpress partner, free basic), or other general dropshipping plugins connect your store to AliExpress or other supplier platforms.
- PrestaShop: Modules are available for integrating with AliExpress and managing dropshipping operations.
These plugins are installed within your e-commerce platform’s admin dashboard (e.g., the WordPress admin area, not CloudPanel). CloudPanel provides the stable hosting environment; the dropshipping functionality comes from the platform and its extensions.
Ensure your server resources are sufficient to handle the demands of these plugins, as they often interact with external APIs (like AliExpress’), which can use server resources.
Security Best Practices
Security is paramount for any online business, especially a dropshipping store handling customer data and payments. CloudPanel offers several features to help you secure your server and websites.
Enforcing Firewalls:
A firewall acts as a barrier, controlling incoming and outgoing network traffic based on predefined rules. CloudPanel often sets up a basic firewall (like UFW – Uncomplicated Firewall on Ubuntu/Debian) during installation.
- Allow Essential Ports: Ensure the firewall allows traffic on necessary ports:
22(SSH): For secure remote access (limit access to trusted IPs if possible).80(HTTP): For standard web traffic (will redirect to HTTPS if SSL is active).443(HTTPS): For secure web traffic (essential for your store).8443(CloudPanel default): To access the CloudPanel interface.
- Block Unnecessary Ports: Block all other ports by default to minimize the attack surface.
CloudPanel’s interface usually provides a way to manage basic firewall rules. For advanced configurations, you might use the command line (sudo ufw status, sudo ufw enable, sudo ufw allow <port>).
Implementing SSL Certificates:
As mentioned earlier, SSL is vital. CloudPanel integrates with Let’s Encrypt, a free certificate authority, making it easy to secure your domain.
- When you add a site in CloudPanel, there’s usually an option to enable “SSL/TLS” or “Let’s Encrypt.”
- Clicking this option tells CloudPanel to automatically obtain and install a free SSL certificate for your domain.
- CloudPanel also handles the automatic renewal of these certificates, which expire every 90 days.
Having a valid SSL certificate installed:
- Encrypts data exchanged with your customers.
- Builds customer trust (users see the padlock icon).
- Is a requirement for payment gateways.
- Is a positive signal for SEO.
DDoS Protection:
DDoS (Distributed Denial of Service) attacks overwhelm a server with traffic to take it offline. While CloudPanel itself isn’t a dedicated DDoS protection service, the server environment and external services help:
- Hosting Provider: Some VPS/cloud providers offer basic network-level DDoS mitigation.
- Cloudflare: Integrating your site with a service like Cloudflare (a CDN and security platform) provides excellent DDoS protection by filtering malicious traffic before it reaches your server. Cloudflare can be easily integrated with a CloudPanel-hosted site by changing your domain’s nameservers to Cloudflare’s.
Regular Updates:
Keeping your server’s operating system, CloudPanel, web server (Nginx), PHP, MySQL, and your e-commerce platform (WordPress, plugins, themes) updated is critical. Updates often include security patches for newly discovered vulnerabilities.
- Server OS & CloudPanel: You can update the server via SSH (
sudo apt update && sudo apt upgrade -y). CloudPanel updates are also managed through the command line, following their documentation. - E-commerce Platform: Update WordPress, WooCommerce, themes, and plugins from their respective admin dashboards.
Neglecting updates leaves your store vulnerable to known exploits.
Two-Factor Authentication (2FA):
Secure access to your CloudPanel is crucial. Enable Two-Factor Authentication for your CloudPanel administrator account. This requires a second verification step (like a code from your phone) in addition to your password, significantly reducing the risk of unauthorized access even if your password is compromised.
By diligently applying these security measures, you create a much safer environment for your dropshipping business and your customers.
Automating Backups & Monitoring
Protecting your data and ensuring your site is always available are essential for a successful dropshipping operation. CloudPanel provides tools to manage backups and monitor server performance.
Configuring Automated Backups to Cloud Storage:
Data loss can be catastrophic for an e-commerce business, leading to lost orders, customer data, and irreversible damage to your reputation. Regular, automated backups are your safety net.
CloudPanel allows you to configure automated backups of your websites (files and databases). Crucially, it supports sending these backups to remote cloud storage locations, which is safer than storing them on the same server your site is running on (in case of server failure).
Common remote storage options supported by CloudPanel include:
- Amazon S3
- S3 Compatible Storage (like DigitalOcean Spaces, Wasabi, MinIO)
- FTP/SFTP
Within the CloudPanel interface, you can typically set up backup jobs:
- Specify which sites to back up.
- Choose the backup frequency (daily, weekly).
- Select the remote storage destination and provide credentials.
- Define a retention policy (how many backups to keep).
Once configured, CloudPanel’s cron jobs will automatically create and upload backups according to your schedule. Regularly verify that your backups are running successfully and occasionally test restoring a backup to ensure the process works.
Using CloudPanel’s Monitoring Tools to Track Uptime and Performance:
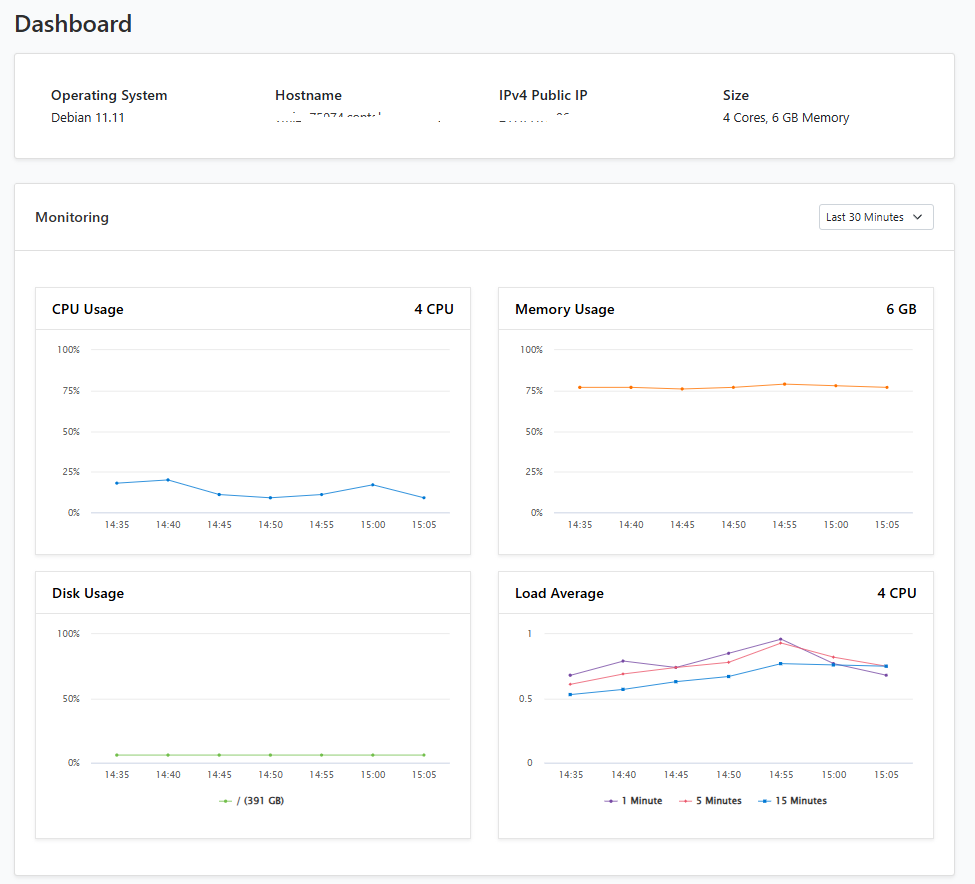
CloudPanel provides a dashboard and monitoring features that give you insights into your server’s health and performance.
- Resource Usage: Monitor CPU load, RAM usage, disk space, and network traffic. High CPU or RAM usage might indicate your site is outgrowing your current server resources or there’s an issue with a script or plugin.
- Service Status: Check the status of essential services like Nginx, PHP-FPM, MySQL/MariaDB, Redis, and Varnish. If a service is down, your website might be inaccessible or malfunctioning.
- Traffic Statistics: While not as detailed as dedicated analytics, CloudPanel can show basic traffic patterns to help correlate server load with visitor activity.
Regularly checking these metrics helps you proactively identify potential issues before they affect your customers. For more advanced uptime monitoring with alerts, consider using external services like UptimeRobot, Pingdom, or Montastic.
By automating backups and actively monitoring your server, you minimize the risk of data loss and downtime, ensuring your dropshipping store remains operational and reliable.
Scaling Your Dropshipping Site
As your dropshipping business grows, so will your website traffic and the demands on your server. CloudPanel runs on scalable infrastructure (VPS/cloud), making it relatively easy to handle increased load.
Upgrading Server Resources During Traffic Spikes:
The most straightforward way to scale with CloudPanel is vertically, by upgrading your existing server’s resources.
- Process: Most VPS and cloud providers allow you to easily scale up your instance by allocating more CPU cores, RAM, or disk space. This process often requires a server reboot, which will cause brief downtime, so plan it during a low-traffic period.
- When to Scale Up: Monitor your CloudPanel’s resource usage. If you consistently see high CPU or RAM usage, especially during peak hours, it’s a strong indicator that you need more resources. A slow site under load directly impacts conversions.
Scaling up is the simplest method for growth but eventually hits limits based on the maximum size offered by your provider for a single instance.
Load Balancing and CDN Integration (Cloudflare):
For larger, high-traffic stores, scaling vertically might not be enough, or you might need higher availability.
- Load Balancing: This involves distributing incoming traffic across multiple servers (a server cluster). CloudPanel is designed to manage single servers, so setting up a load-balanced environment with CloudPanel requires more advanced configuration outside of the panel itself, typically using a load balancer service provided by your cloud provider or a third-party solution. Each server in the cluster would likely run CloudPanel or just the web server/application stack managed separately. This is a step for more advanced users with significant traffic.
- CDN Integration (Cloudflare): A Content Delivery Network like Cloudflare is invaluable for scaling and performance. It caches your site’s static assets (images, CSS, JavaScript) on servers distributed globally. When a user visits your site, static content is served from the server geographically closest to them, significantly reducing load times and reducing the load on your origin server (the one running CloudPanel). Cloudflare also offers security benefits like WAF (Web Application Firewall) and DDoS protection.
Integrating Cloudflare is relatively simple: change your domain’s nameservers to Cloudflare’s, and Cloudflare will proxy traffic to your CloudPanel server. CloudPanel is fully compatible with Cloudflare.
Scaling your infrastructure ensures your dropshipping store remains fast and responsive, even as your customer base and traffic grow.
Troubleshooting Common Issues
Even with a smooth installation, you might encounter issues later. Knowing how to approach common problems will save you time and frustration.
- Fixing Installation Errors or Service Conflicts:
- Check Installation Logs: If the CloudPanel installation script fails, carefully read the output in your SSH terminal. It often indicates the cause.
- Check Service Status: If your website or CloudPanel isn’t accessible after installation, check the status of key services via SSH: Bash
sudo systemctl status nginx sudo systemctl status phpX.Y-fpm # Replace X.Y sudo systemctl status mysql # Or mariadb sudo systemctl status cloudpanel - Look for errors in the output. Restart services if they are dead or failed (
sudo systemctl restart <service_name>). - Firewall: Ensure the necessary ports (80, 443, 22, 8443) are open in your server’s firewall (
sudo ufw status). - Conflicting Software: Ensure your server is a fresh installation with no other web servers (Apache), control panels, or database servers already running, as they can conflict with CloudPanel’s stack.
- Resolving Slow Performance with Optimization Tips:
- Monitor Resources: Use CloudPanel’s monitoring or command-line tools (
htop,free -m,df -h) to see if CPU, RAM, or disk I/O are bottlenecks. If so, consider scaling up your server. - Check Caching: Verify that Varnish and/or Redis are enabled and configured correctly in CloudPanel for your site. Ensure your e-commerce platform’s caching plugin is active and configured correctly.
- Database Optimization: Slow database queries can cripple performance. For WordPress/WooCommerce, plugins like WP-Optimize can help clean and optimize the database. For any platform, large databases might require manual indexing or optimization by a database administrator.
- Check E-commerce Platform: High resource usage can often be traced back to inefficient themes, poorly coded plugins, or a large number of active plugins on your e-commerce platform. Disable plugins one by one to identify culprits.
- Enable Gzip Compression: Ensure your server (Nginx, handled by CloudPanel) is configured to compress web assets (HTML, CSS, JS) before sending them to the browser. CloudPanel usually handles this by default.
- Optimize Images: Large, unoptimized images are a major cause of slow loading times. Use image optimization tools and ensure images are appropriately sized.
- Monitor Resources: Use CloudPanel’s monitoring or command-line tools (
- Website Shows Default Page or Error:
- DNS: Double-check that your domain’s A records correctly point to your server’s IP address. Allow time for DNS propagation.
- CloudPanel Site Configuration: Ensure the domain name in your CloudPanel site settings exactly matches your actual domain.
- Web Server Logs: Check Nginx error logs (
/var/log/nginx/) for clues about why the site isn’t loading correctly. - PHP Errors: Enable PHP error logging (temporarily) to see if PHP errors are preventing the site from loading.
Troubleshooting requires a systematic approach. Check server resources, verify service status, examine logs, and review recent changes to your configuration or website.
Case Study: Successful Dropshipping Store Using CloudPanel (Simulated)
Let’s look at a hypothetical example demonstrating the impact of using CloudPanel for a dropshipping store.
Meet “EcomEssentials,” a burgeoning dropshipping store selling unique home gadgets. Initially, EcomEssentials was hosted on an inexpensive shared hosting plan.
Challenges with Shared Hosting:
- Slow Load Times: Pages took 5-8 seconds to load, especially product pages with multiple images and scripts. This led to a high bounce rate.
- Frequent Downtime: The site would occasionally go offline during peak traffic hours or when other sites on the shared server consumed too many resources.
- Limited Control: Unable to install caching like Redis or Varnish, or optimize server settings for WooCommerce.
- Security Concerns: Relying solely on the host’s security measures felt insufficient.
Seeking a more reliable and scalable solution, the owner of EcomEssentials decided to migrate to a 4GB RAM VPS and installed CloudPanel.
Implementation with CloudPanel:
- Provisioned a VPS running Ubuntu 20.04.
- Installed CloudPanel using the simple script.
- Used the one-click installer to migrate their existing WordPress/WooCommerce site.
- Enabled Varnish and Redis caching via the CloudPanel interface.
- Obtained a free Let’s Encrypt SSL certificate through CloudPanel.
- Configured automated daily backups to DigitalOcean Spaces.
- Monitored resource usage via the CloudPanel dashboard.
Results After Switching to CloudPanel:
- Improved Site Speed: Average page load times dropped to under 2 seconds. This was largely due to dedicated resources, optimized Nginx, and effective caching.
- Increased Uptime: With dedicated resources and better monitoring, the site experienced virtually no unscheduled downtime.
- Enhanced Performance: The site handled traffic spikes much better, leading to a smoother customer experience during promotions.
- Better Security: Confidence increased with the ability to manage firewalls, easily deploy SSL, and enforce 2FA on the panel.
- Simplified Management: Managing multiple sites (as EcomEssentials planned to expand) became easy through the intuitive CloudPanel interface.
By migrating to CloudPanel, EcomEssentials gained the control, performance, and reliability needed to support its growth, demonstrating how a capable control panel on a solid VPS foundation can significantly impact a dropshipping business’s success.
Future-Proofing Your Setup
Technology evolves, and so should your dropshipping infrastructure. Keeping your CloudPanel setup current is important for security, performance, and accessing new features.
- Staying Updated with CloudPanel’s Latest Features: CloudPanel is actively developed. New versions bring performance improvements, security enhancements, and new features. Follow the official CloudPanel documentation for instructions on how to update your CloudPanel installation. This typically involves running commands via SSH.
- Keeping Server OS Updated: Regularly apply operating system updates (
sudo apt update && sudo apt upgrade -y) to patch security vulnerabilities at the server level. - Updating E-commerce Platform and Plugins: As mentioned before, keep WordPress/WooCommerce, themes, and plugins updated from their respective dashboards.
- Considering PHP Version Upgrades: Newer PHP versions often offer significant performance improvements. When a new PHP version is released and supported by CloudPanel and your e-commerce platform/plugins, plan an upgrade. CloudPanel makes managing multiple PHP versions and switching between them easier.
- Migrating from Other Control Panels (cPanel/Plesk): If you’re moving from another control panel, the migration process involves backing up your website files and databases from the old host and restoring them on your new CloudPanel server. CloudPanel doesn’t have an automated migration tool from other panels, so this is typically a manual or semi-manual process. Tools like rsync for files and mysqldump for databases are commonly used via SSH.
Staying proactive with updates and being aware of new technologies will help your dropshipping store remain competitive and secure in the long run.
FAQ Section
Here are answers to some common questions about using CloudPanel for dropshipping:
Is CloudPanel free?
Yes, CloudPanel Community Edition (CE) is completely free and open-source. You only pay for the underlying server from your chosen VPS or cloud provider.
Can I host multiple stores on one CloudPanel server?
Yes, absolutely. CloudPanel is designed to host multiple websites (domains) on a single server, provided the server has sufficient resources (CPU, RAM, disk space) to handle the combined traffic and demands of all the sites.
How is CloudPanel different from cPanel or Plesk?
CloudPanel is generally considered more lightweight, modern, and specifically optimized for PHP applications (like WordPress, Magento, etc.). It’s free, whereas cPanel and Plesk require paid licenses, which can be expensive. CloudPanel’s interface is simpler, focusing on essential web hosting tasks rather than email hosting or reseller features often found in cPanel/Plesk.
What happens if my server runs out of resources?
If your server runs out of CPU, RAM, or disk space, your website will become slow, unresponsive, or even go offline. You will need to upgrade your server’s resources with your VPS provider. CloudPanel’s monitoring helps you anticipate this.
Do I need to be a server expert to use CloudPanel?
No, you don’t need to be an expert. CloudPanel significantly simplifies server management tasks. However, basic familiarity with concepts like DNS, SSH, and file systems is helpful, especially for troubleshooting.
How do I get support for CloudPanel?
CloudPanel has excellent official documentation. There’s also an active community forum where you can ask questions and find solutions. For server-level issues (hardware, network), you would contact your VPS provider’s support.
Can I use CloudPanel on any VPS provider?
Yes, as long as the provider offers a fresh instance of a supported operating system (Debian 10/11, Ubuntu 20.04 LTS) and provides you with root SSH access.
Tools & Resources
Here are some useful tools and resources mentioned in this guide:
- CloudPanel Official Website & Documentation: The primary source for installation guides, updates, and feature details. ([Search: CloudPanel documentation])
- Recommended Hosting Providers:
- DigitalOcean ([Search: DigitalOcean VPS])
- AWS (EC2) ([Search: AWS EC2])
- Google Cloud Platform (Compute Engine) ([Search: GCP Compute Engine])
- Vultr ([Search: Vultr VPS])
- Linode ([Search: Linode VPS]) (Choose a provider based on your budget, required resources, and technical comfort level).
- SSH Clients:
- OpenSSH (Built into Linux/macOS)
- PuTTY (for Windows) ([Search: PuTTY download])
- Termius (Cross-platform) ([Search: Termius SSH client])
- DNS Propagation Checkers: Tools to see if your domain’s DNS changes have updated globally. ([Search: DNS propagation checker])
- Website Speed Test Tools: Measure your site’s loading speed.
- GTmetrix ([Search: GTmetrix])
- PageSpeed Insights (Google) ([Search: Google PageSpeed Insights])
- Image Optimization Tools:
- TinyPNG/TinyJPG (Web service) ([Search: TinyPNG])
- Imagify (WordPress plugin) ([Search: Imagify WordPress plugin])
- Cloudflare: For CDN and security. ([Search: Cloudflare])
- E-commerce Platforms:
- WordPress + WooCommerce ([Search: WooCommerce])
- PrestaShop ([Search: PrestaShop])
- Dropshipping Plugins/Modules:
- DSers (for AliExpress/WooCommerce) ([Search: DSers WooCommerce])
- AliDropship (for AliExpress/WordPress) ([Search: AliDropship plugin]) (Search for plugins/modules specific to your chosen e-commerce platform and suppliers).
Conclusion
Installing CloudPanel provides a robust, cost-effective, and manageable hosting environment for your dropshipping store. It empowers you with dedicated server resources, simplified management, essential security features, and the performance needed to succeed in the competitive e-commerce landscape.
By following the steps outlined in this guide – from setting up your server and installing CloudPanel to configuring performance settings, enhancing security, and planning for scale – you build a solid foundation for your online business. CloudPanel allows you to focus more on marketing and sales and less on complex server administration.
Ready to take control of your hosting? Get your VPS and start your CloudPanel installation today! The performance benefits can significantly impact your site speed, customer experience, and ultimately, your sales.
Got questions about installing or configuring CloudPanel for your dropshipping site? Share them in the comments below!
Leave a Reply
You must be logged in to post a comment.